Collecting Field Data
star
This example shows the process for documenting a Fire Progression Indicator (FPI) observation using the O&C Investigation Layer Template. The basic workflow is presented.
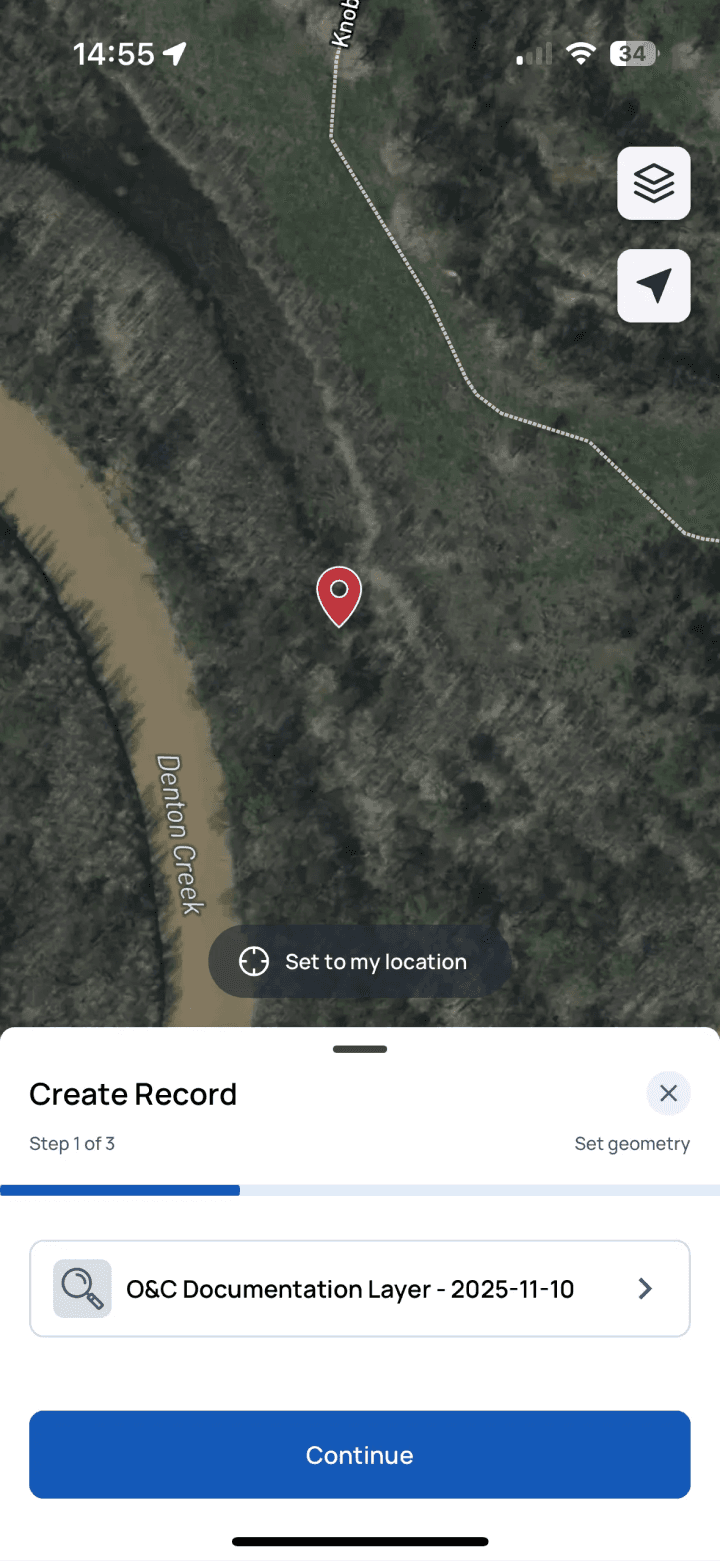
1. From the Map view, click the blue “Add” button

2. Select the layer for which you want to add data
The selected layer here will be auto-selected for future records until you manually select a different layer.
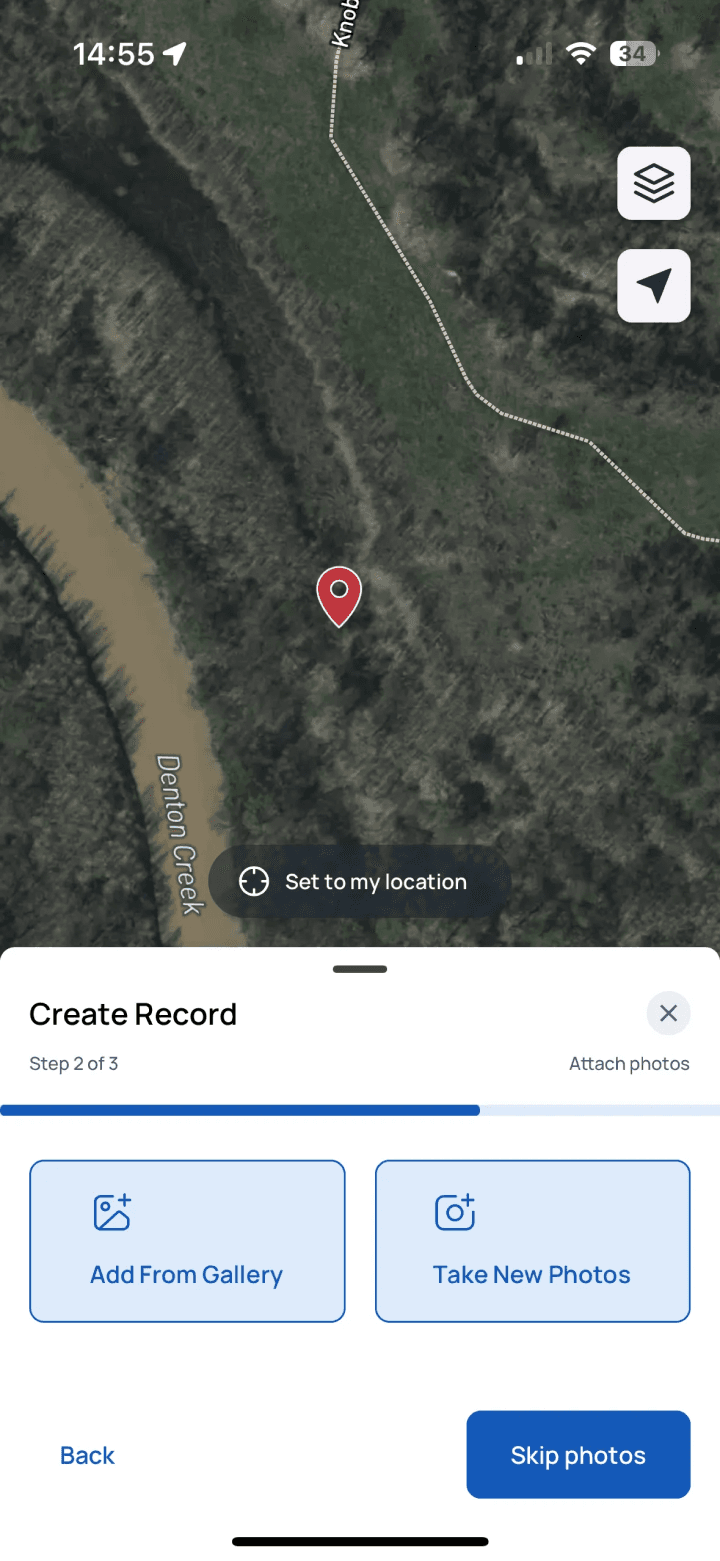
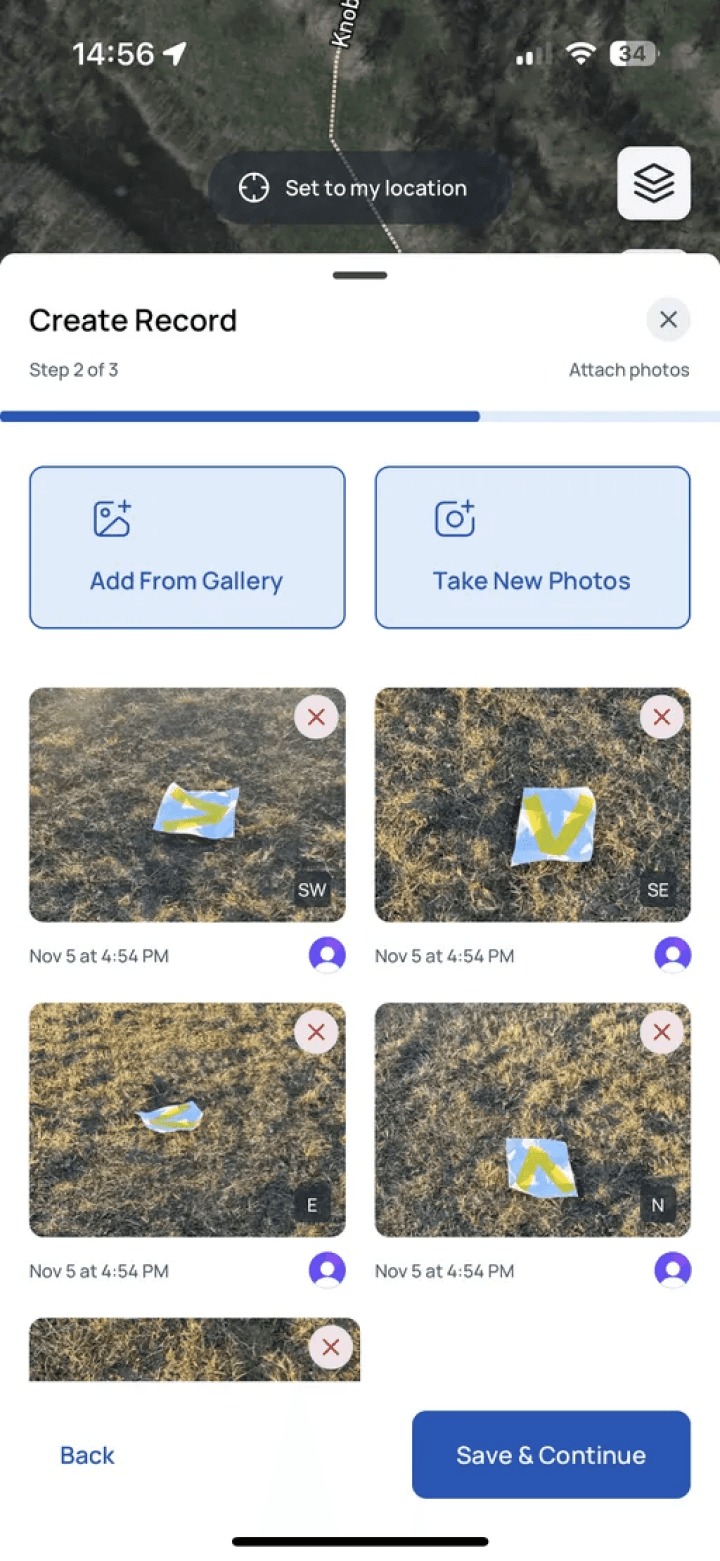
3. Take new photos or add them from your library
 |  |
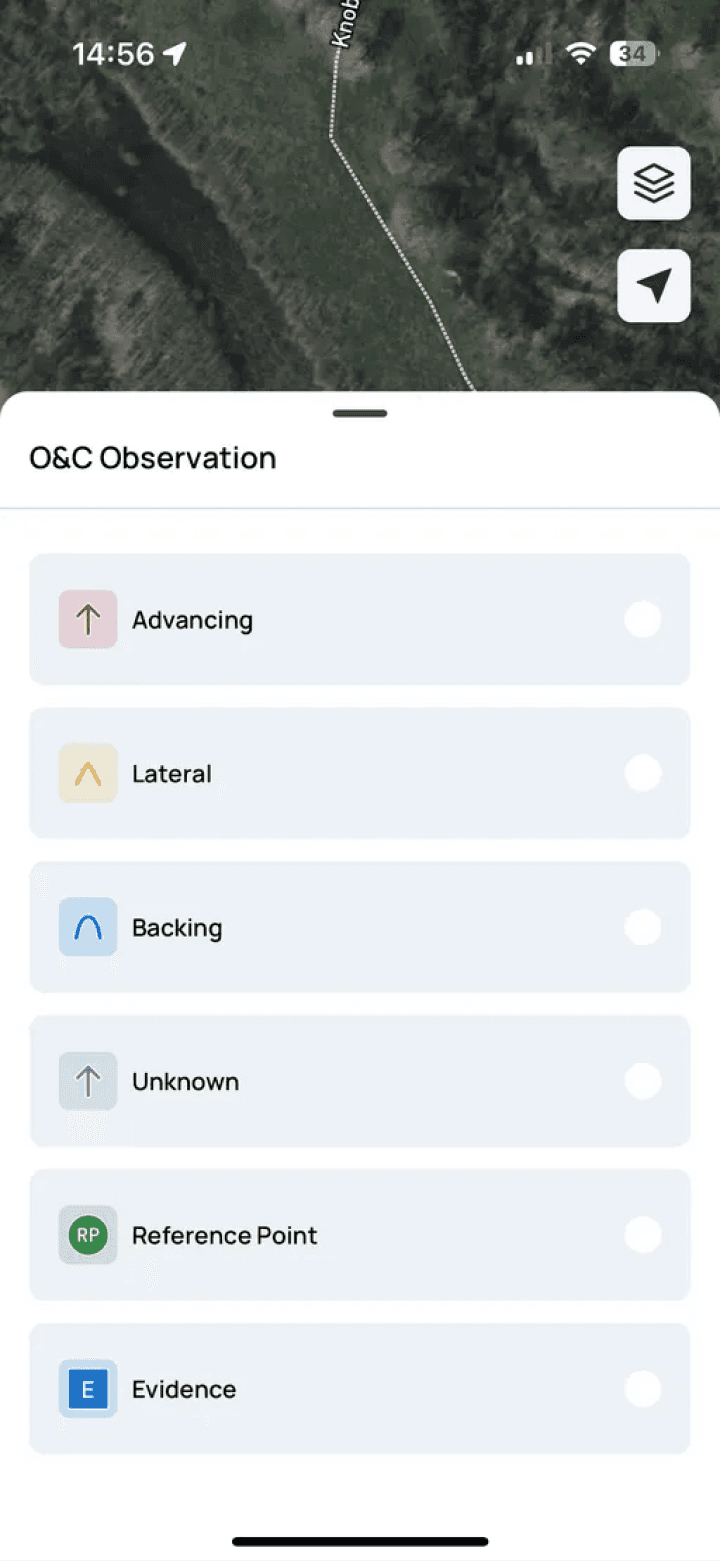
4. Select the options to complete documentation for the Fire Progression Indicator (FPI)
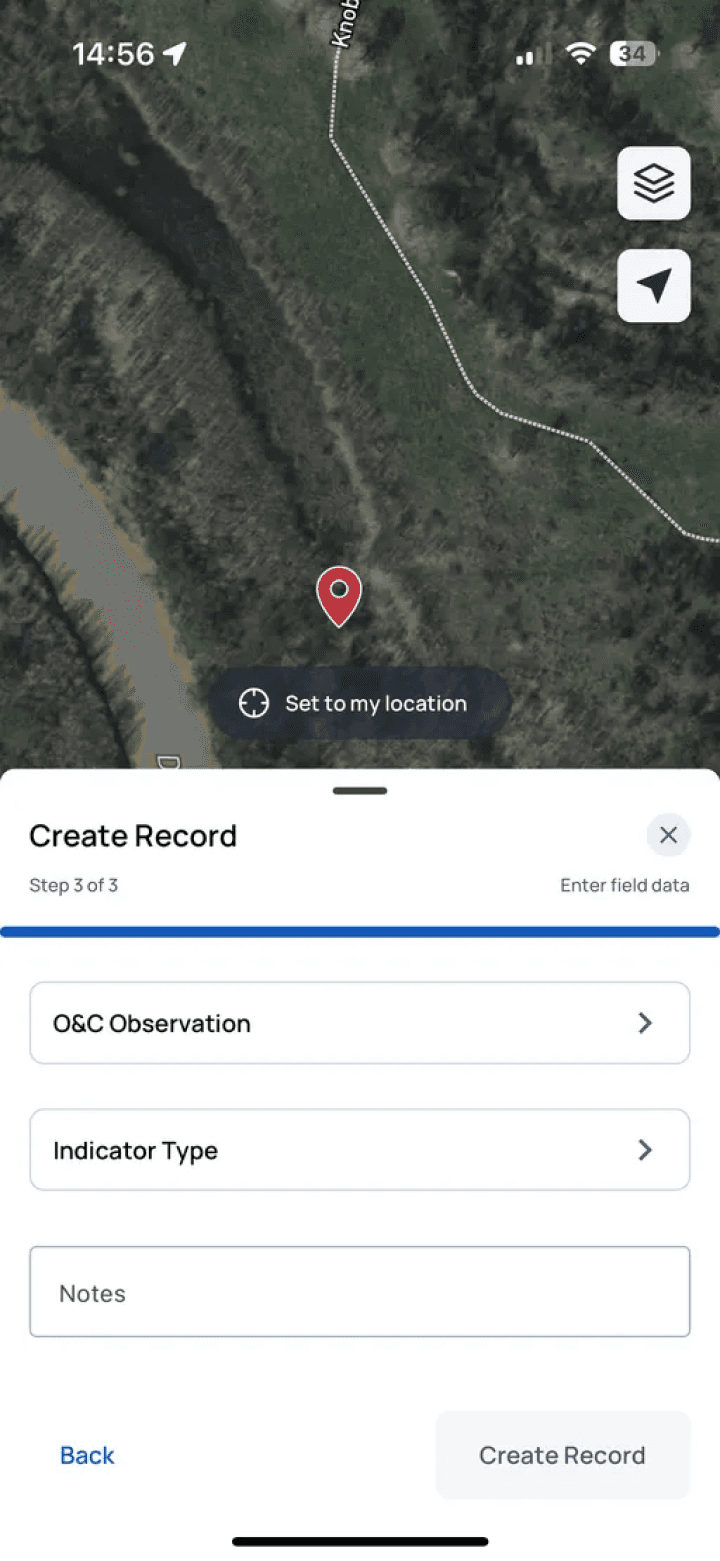
5. Select the Observation Type
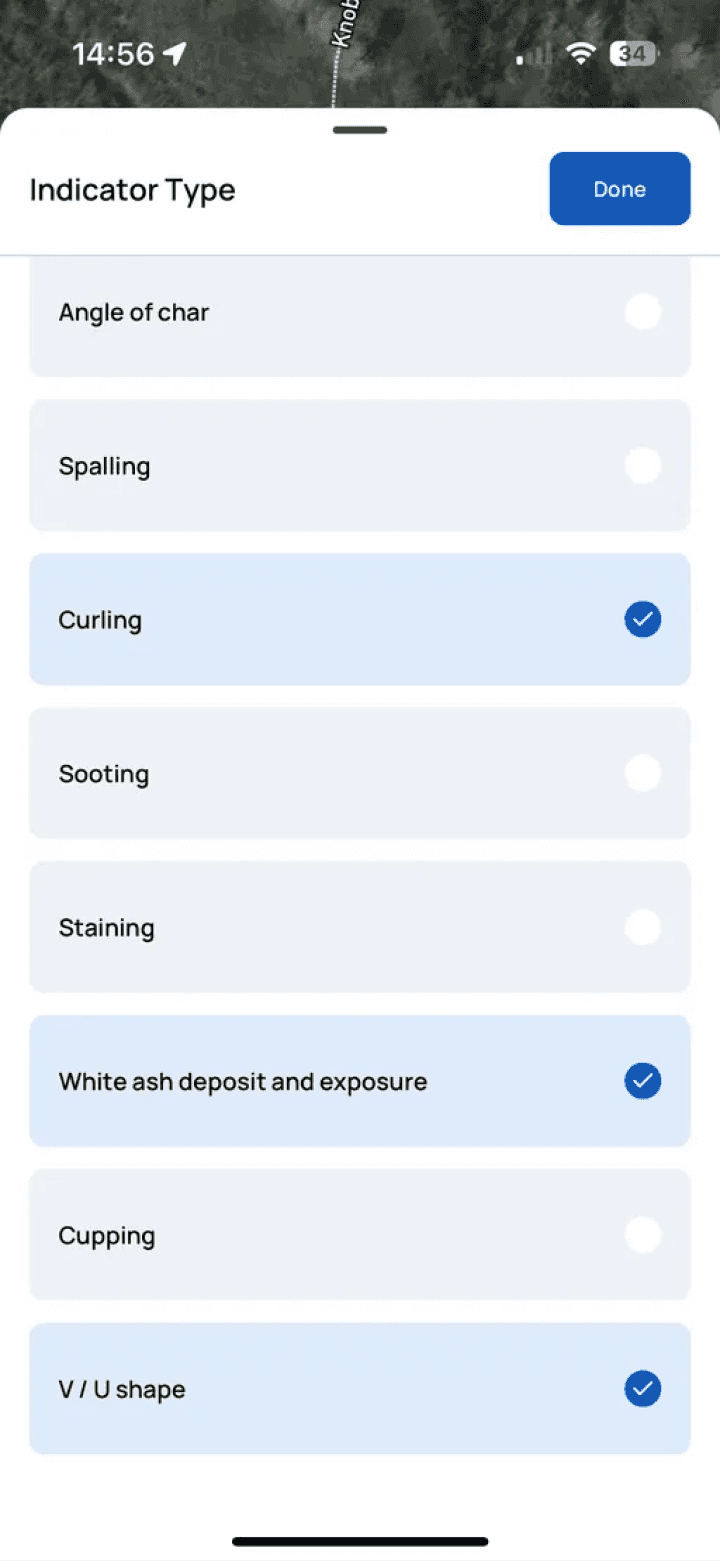
6. Select the Indicator Type(s)
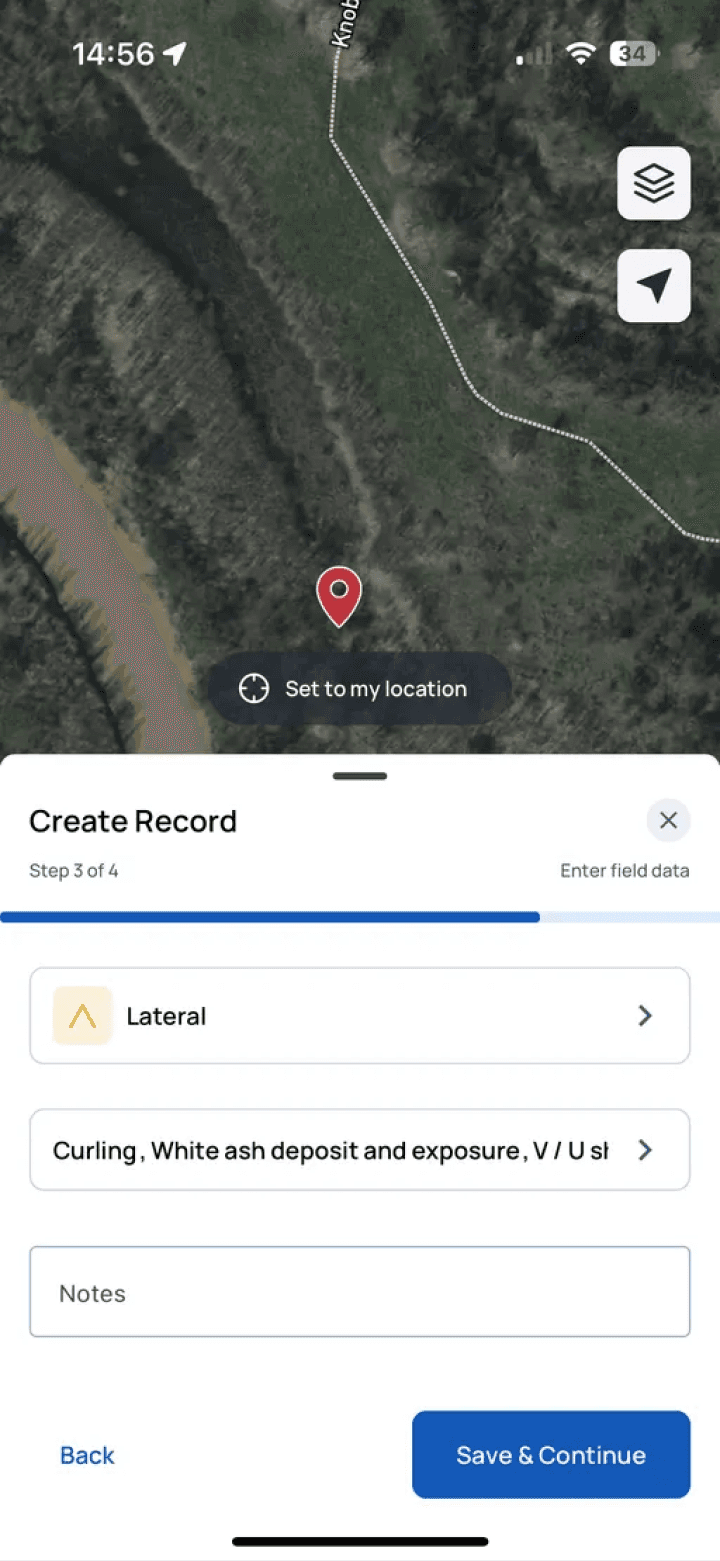
7. Review and/or add notes
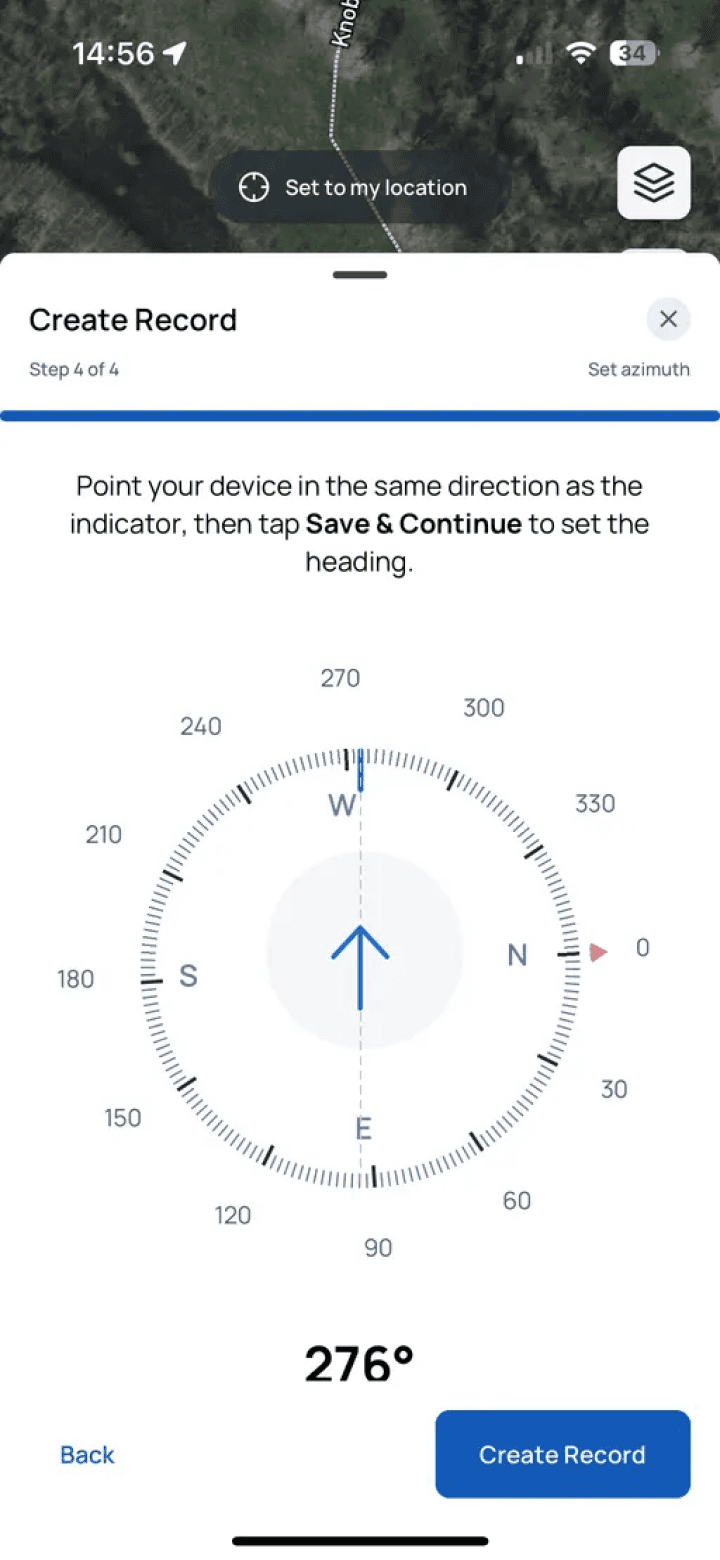
8. Capture the FPI heading
Orient your phone in the direction of the fire progression indicator and select “Create Record” to capture the heading using the compass.
9. Immediately see the indicator on the map with correct symbology
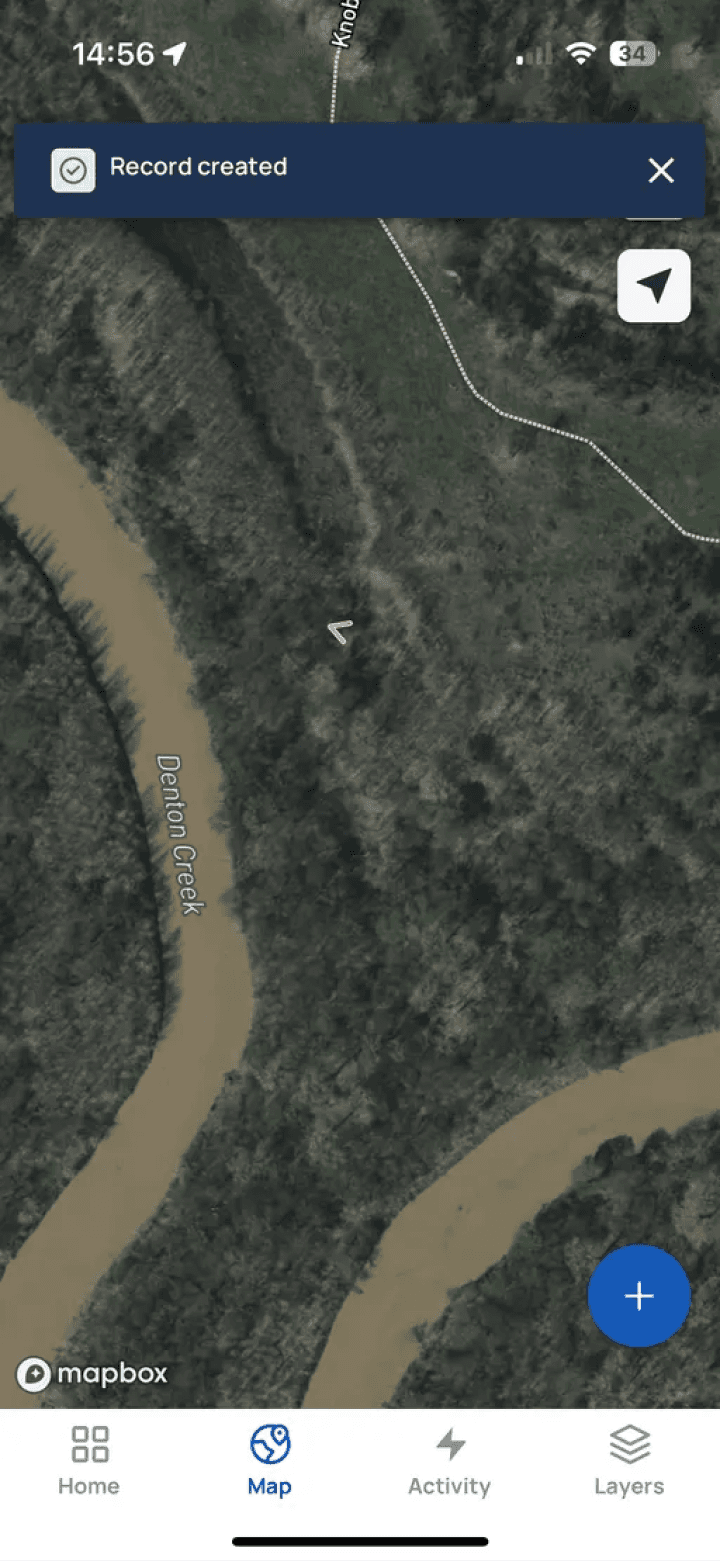
1. From the Map view, click the blue “Add” button
2. Select the layer for which you want to add data
The selected layer here will be auto-selected for future records until you manually select a different layer.
3. Take new photos or add them from your library
| |
4. Select the options to complete documentation for the Fire Progression Indicator (FPI)
5. Select the Observation Type
6. Select the Indicator Type(s)
7. Review and/or add notes
8. Capture the FPI heading
Orient your phone in the direction of the fire progression indicator and select “Create Record” to capture the heading using the compass.
9. Immediately see the indicator on the map with correct symbology

" width="120.85913291802922px"><g d="M 18.62 14.573 C 18.648 12.438 19.766 10.466 21.585 9.348 C 20.433 7.702 18.572 6.696 16.563 6.632 C 14.45 6.411 12.401 7.897 11.324 7.897 C 10.227 7.897 8.569 6.654 6.783 6.691 C 4.435 6.767 2.299 8.07 1.156 10.124 C -1.278 14.337 0.537 20.53 2.869 23.935 C 4.034 25.603 5.398 27.466 7.181 27.4 C 8.926 27.327 9.579 26.287 11.685 26.287 C 13.773 26.287 14.384 27.4 16.204 27.359 C 18.077 27.327 19.257 25.683 20.382 24 C 21.221 22.811 21.866 21.498 22.294 20.108 C 20.069 19.167 18.623 16.987 18.62 14.572 Z M 15.182 4.393 C 16.204 3.167 16.708 1.591 16.586 0 C 15.026 0.164 13.584 0.91 12.549 2.089 C 11.527 3.251 11.009 4.773 11.109 6.318 C 12.69 6.334 14.192 5.625 15.182 4.393 Z M 39.561 23.346 L 33.832 23.346 L 32.458 27.407 L 30.031 27.407 L 35.456 12.38 L 37.977 12.38 L 43.403 27.407 L 40.934 27.407 Z M 34.426 21.471 L 38.967 21.471 L 36.728 14.88 L 36.665 14.88 Z M 55.12 21.93 C 55.12 25.334 53.297 27.521 50.546 27.521 C 49.125 27.595 47.787 26.851 47.1 25.605 L 47.048 25.605 L 47.048 31.031 L 44.799 31.031 L 44.799 16.451 L 46.976 16.451 L 46.976 18.273 L 47.017 18.273 C 47.735 17.035 49.075 16.291 50.506 16.337 C 53.287 16.337 55.119 18.535 55.119 21.93 Z M 52.808 21.93 C 52.808 19.712 51.662 18.254 49.912 18.254 C 48.194 18.254 47.038 19.743 47.038 21.93 C 47.038 24.138 48.195 25.616 49.912 25.616 C 51.662 25.616 52.808 24.168 52.808 21.93 Z M 67.179 21.93 C 67.179 25.334 65.355 27.521 62.604 27.521 C 61.184 27.595 59.845 26.851 59.158 25.605 L 59.106 25.605 L 59.106 31.031 L 56.858 31.031 L 56.858 16.451 L 59.035 16.451 L 59.035 18.273 L 59.076 18.273 C 59.794 17.035 61.134 16.291 62.565 16.337 C 65.344 16.337 67.179 18.535 67.179 21.93 Z M 64.866 21.93 C 64.866 19.712 63.72 18.254 61.97 18.254 C 60.252 18.254 59.096 19.743 59.096 21.93 C 59.096 24.138 60.252 25.616 61.97 25.616 C 63.72 25.616 64.866 24.168 64.866 21.93 Z M 75.147 23.22 C 75.313 24.711 76.76 25.689 78.739 25.689 C 80.635 25.689 81.998 24.711 81.998 23.367 C 81.998 22.2 81.176 21.503 79.227 21.024 L 77.28 20.554 C 74.521 19.889 73.24 18.598 73.24 16.503 C 73.24 13.911 75.499 12.13 78.707 12.13 C 81.884 12.13 84.06 13.911 84.133 16.503 L 81.863 16.503 C 81.727 15.004 80.488 14.099 78.676 14.099 C 76.863 14.099 75.625 15.015 75.625 16.347 C 75.625 17.409 76.416 18.035 78.354 18.513 L 80.009 18.92 C 83.092 19.649 84.371 20.887 84.371 23.086 C 84.371 25.897 82.133 27.658 78.572 27.658 C 75.24 27.658 72.989 25.939 72.844 23.22 Z M 89.228 13.859 L 89.228 16.451 L 91.311 16.451 L 91.311 18.232 L 89.228 18.232 L 89.228 24.272 C 89.228 25.211 89.645 25.648 90.561 25.648 C 90.808 25.643 91.055 25.626 91.3 25.596 L 91.3 27.366 C 90.889 27.443 90.47 27.478 90.052 27.47 C 87.834 27.47 86.968 26.636 86.968 24.511 L 86.968 18.232 L 85.376 18.232 L 85.376 16.451 L 86.968 16.451 L 86.968 13.859 Z M 92.517 21.93 C 92.517 18.483 94.547 16.317 97.713 16.317 C 100.889 16.317 102.91 18.483 102.91 21.93 C 102.91 25.386 100.9 27.543 97.713 27.543 C 94.527 27.543 92.517 25.386 92.517 21.93 Z M 100.618 21.93 C 100.618 19.566 99.535 18.169 97.713 18.169 C 95.89 18.169 94.807 19.576 94.807 21.93 C 94.807 24.305 95.89 25.689 97.711 25.689 C 99.533 25.689 100.618 24.305 100.618 21.93 Z M 104.764 16.451 L 106.909 16.451 L 106.909 18.316 L 106.96 18.316 C 107.26 17.116 108.359 16.291 109.594 16.337 C 109.854 16.336 110.112 16.364 110.365 16.421 L 110.365 18.524 C 110.038 18.424 109.697 18.378 109.355 18.388 C 108.694 18.362 108.054 18.625 107.603 19.11 C 107.153 19.594 106.936 20.252 107.011 20.909 L 107.011 27.407 L 104.763 27.407 Z M 120.734 24.19 C 120.432 26.178 118.496 27.543 116.018 27.543 C 112.83 27.543 110.852 25.408 110.852 21.982 C 110.852 18.546 112.841 16.317 115.922 16.317 C 118.954 16.317 120.859 18.398 120.859 21.721 L 120.859 22.492 L 113.122 22.492 L 113.122 22.627 C 113.05 23.443 113.332 24.25 113.896 24.844 C 114.46 25.438 115.251 25.76 116.07 25.73 C 117.16 25.832 118.189 25.206 118.599 24.19 Z M 113.133 20.92 L 118.61 20.92 C 118.651 20.187 118.384 19.47 117.874 18.943 C 117.364 18.415 116.657 18.124 115.923 18.139 C 115.183 18.135 114.473 18.426 113.948 18.948 C 113.424 19.47 113.131 20.18 113.133 20.92 Z" fill="transparent" height="31.03139438848416px" id="K7RyUQWHa" transform="translate(0 0)" width="120.85913293405739px"><g d="M 18.62 14.573 C 18.648 12.438 19.766 10.466 21.585 9.348 C 20.433 7.702 18.572 6.696 16.563 6.632 C 14.45 6.411 12.401 7.897 11.324 7.897 C 10.227 7.897 8.569 6.654 6.783 6.691 C 4.435 6.767 2.299 8.07 1.156 10.124 C -1.278 14.337 0.537 20.53 2.869 23.935 C 4.034 25.603 5.398 27.466 7.181 27.4 C 8.926 27.327 9.579 26.287 11.685 26.287 C 13.773 26.287 14.384 27.4 16.204 27.359 C 18.077 27.327 19.257 25.683 20.382 24 C 21.221 22.811 21.866 21.498 22.294 20.108 C 20.069 19.167 18.623 16.987 18.62 14.572 Z M 15.182 4.393 C 16.204 3.167 16.708 1.591 16.586 0 C 15.026 0.164 13.584 0.91 12.549 2.089 C 11.527 3.251 11.009 4.773 11.109 6.318 C 12.69 6.334 14.192 5.625 15.182 4.393 Z" fill="transparent" height="27.40166472704012px" id="VfppIOtXP" width="22.29416137777754px"><path d="M 18.62 14.573 C 18.648 12.438 19.766 10.466 21.585 9.348 C 20.433 7.702 18.572 6.696 16.563 6.632 C 14.45 6.411 12.401 7.897 11.324 7.897 C 10.227 7.897 8.569 6.654 6.783 6.691 C 4.435 6.767 2.299 8.07 1.156 10.124 C -1.278 14.337 0.537 20.53 2.869 23.935 C 4.034 25.603 5.398 27.466 7.181 27.4 C 8.926 27.327 9.579 26.287 11.685 26.287 C 13.773 26.287 14.384 27.4 16.204 27.359 C 18.077 27.327 19.257 25.683 20.382 24 C 21.221 22.811 21.866 21.498 22.294 20.108 C 20.069 19.167 18.623 16.987 18.62 14.572 Z M 15.182 4.393 C 16.204 3.167 16.708 1.591 16.586 0 C 15.026 0.164 13.584 0.91 12.549 2.089 C 11.527 3.251 11.009 4.773 11.109 6.318 C 12.69 6.334 14.192 5.625 15.182 4.393 Z" fill="rgb(0, 0, 0)" height="27.40166472704012px" id="UoawEV2CS" width="22.29416137777754px"/></g><path d="M 9.529 11.216 L 3.801 11.216 L 2.426 15.277 L 0 15.277 L 5.425 0.25 L 7.945 0.25 L 13.371 15.277 L 10.903 15.277 Z M 4.395 9.341 L 8.935 9.341 L 6.697 2.751 L 6.634 2.751 Z M 25.089 9.8 C 25.089 13.204 23.265 15.391 20.515 15.391 C 19.094 15.465 17.755 14.721 17.068 13.475 L 17.016 13.475 L 17.016 18.902 L 14.768 18.902 L 14.768 4.321 L 16.945 4.321 L 16.945 6.144 L 16.986 6.144 C 17.704 4.905 19.044 4.161 20.475 4.207 C 23.255 4.207 25.087 6.405 25.087 9.8 Z M 22.776 9.8 C 22.776 7.582 21.63 6.124 19.88 6.124 C 18.162 6.124 17.007 7.613 17.007 9.8 C 17.007 12.008 18.163 13.486 19.88 13.486 C 21.63 13.486 22.776 12.038 22.776 9.8 Z M 37.147 9.8 C 37.147 13.204 35.324 15.391 32.573 15.391 C 31.152 15.465 29.814 14.721 29.127 13.475 L 29.075 13.475 L 29.075 18.902 L 26.826 18.902 L 26.826 4.321 L 29.003 4.321 L 29.003 6.144 L 29.044 6.144 C 29.762 4.905 31.102 4.161 32.533 4.207 C 35.313 4.207 37.147 6.405 37.147 9.8 Z M 34.835 9.8 C 34.835 7.582 33.689 6.124 31.939 6.124 C 30.221 6.124 29.065 7.613 29.065 9.8 C 29.065 12.008 30.221 13.486 31.939 13.486 C 33.689 13.486 34.835 12.038 34.835 9.8 Z M 45.116 11.09 C 45.281 12.581 46.729 13.559 48.707 13.559 C 50.603 13.559 51.967 12.581 51.967 11.237 C 51.967 10.07 51.144 9.373 49.196 8.894 L 47.249 8.425 C 44.49 7.759 43.208 6.468 43.208 4.373 C 43.208 1.781 45.468 0 48.676 0 C 51.852 0 54.029 1.781 54.102 4.373 L 51.832 4.373 C 51.696 2.874 50.457 1.969 48.644 1.969 C 46.831 1.969 45.594 2.885 45.594 4.217 C 45.594 5.28 46.385 5.905 48.322 6.383 L 49.978 6.79 C 53.061 7.519 54.34 8.757 54.34 10.956 C 54.34 13.767 52.101 15.528 48.54 15.528 C 45.209 15.528 42.958 13.809 42.813 11.09 Z M 59.196 1.729 L 59.196 4.321 L 61.28 4.321 L 61.28 6.102 L 59.196 6.102 L 59.196 12.142 C 59.196 13.081 59.614 13.518 60.53 13.518 C 60.777 13.514 61.024 13.496 61.269 13.466 L 61.269 15.236 C 60.857 15.313 60.439 15.348 60.02 15.34 C 57.802 15.34 56.937 14.506 56.937 12.382 L 56.937 6.102 L 55.344 6.102 L 55.344 4.321 L 56.937 4.321 L 56.937 1.729 Z M 62.485 9.8 C 62.485 6.353 64.516 4.187 67.681 4.187 C 70.858 4.187 72.879 6.353 72.879 9.8 C 72.879 13.256 70.869 15.413 67.681 15.413 C 64.495 15.413 62.485 13.256 62.485 9.8 Z M 70.587 9.8 C 70.587 7.436 69.504 6.04 67.681 6.04 C 65.859 6.04 64.776 7.446 64.776 9.8 C 64.776 12.175 65.859 13.559 67.68 13.559 C 69.501 13.559 70.587 12.175 70.587 9.8 Z M 74.732 4.321 L 76.878 4.321 L 76.878 6.186 L 76.929 6.186 C 77.228 4.986 78.327 4.161 79.563 4.207 C 79.822 4.206 80.081 4.234 80.334 4.291 L 80.334 6.394 C 80.007 6.294 79.665 6.248 79.323 6.259 C 78.662 6.232 78.022 6.495 77.572 6.98 C 77.121 7.464 76.905 8.122 76.979 8.779 L 76.979 15.277 L 74.731 15.277 Z M 90.703 12.06 C 90.401 14.048 88.464 15.413 85.986 15.413 C 82.799 15.413 80.82 13.278 80.82 9.853 C 80.82 6.416 82.81 4.187 85.891 4.187 C 88.923 4.187 90.828 6.268 90.828 9.591 L 90.828 10.362 L 83.09 10.362 L 83.09 10.497 C 83.018 11.313 83.3 12.12 83.864 12.714 C 84.428 13.308 85.22 13.63 86.038 13.6 C 87.129 13.702 88.157 13.076 88.567 12.06 Z M 83.101 8.79 L 88.578 8.79 C 88.619 8.057 88.352 7.341 87.843 6.813 C 87.333 6.285 86.626 5.994 85.892 6.009 C 85.152 6.005 84.441 6.296 83.917 6.818 C 83.393 7.34 83.099 8.05 83.101 8.79 Z" fill="rgb(0, 0, 0)" height="18.901512529658476px" id="GRxML5ePE" transform="translate(30.031 12.13)" width="90.8276921991941px"/></g><path d="M 2.608 0.356 C 3.562 0.287 4.498 0.65 5.156 1.346 C 5.814 2.041 6.126 2.994 6.006 3.944 C 6.006 6.25 4.759 7.576 2.608 7.576 L 0 7.576 L 0 0.355 Z M 1.122 6.555 L 2.483 6.555 C 3.165 6.595 3.829 6.327 4.291 5.823 C 4.753 5.319 4.963 4.634 4.863 3.958 C 4.956 3.285 4.743 2.606 4.282 2.106 C 3.821 1.606 3.162 1.338 2.483 1.376 L 1.122 1.376 Z M 7.271 4.849 C 7.182 3.874 7.651 2.932 8.483 2.417 C 9.316 1.902 10.368 1.902 11.2 2.417 C 12.032 2.932 12.502 3.874 12.412 4.849 C 12.509 5.828 12.042 6.777 11.207 7.297 C 10.371 7.817 9.313 7.817 8.478 7.297 C 7.642 6.777 7.175 5.828 7.273 4.849 Z M 11.306 4.849 C 11.306 3.668 10.775 2.977 9.844 2.977 C 8.909 2.977 8.383 3.668 8.383 4.849 C 8.383 6.04 8.909 6.724 9.844 6.724 C 10.776 6.724 11.306 6.035 11.306 4.849 Z M 19.243 7.576 L 18.127 7.576 L 17.002 3.562 L 16.917 3.562 L 15.795 7.576 L 14.69 7.576 L 13.187 2.127 L 14.279 2.127 L 15.254 6.285 L 15.335 6.285 L 16.456 2.127 L 17.487 2.127 L 18.607 6.285 L 18.692 6.285 L 19.664 2.127 L 20.74 2.127 Z M 22.003 2.127 L 23.038 2.127 L 23.038 2.993 L 23.117 2.993 C 23.397 2.355 24.05 1.965 24.744 2.022 C 25.281 1.982 25.807 2.188 26.174 2.582 C 26.541 2.976 26.709 3.516 26.63 4.049 L 26.63 7.576 L 25.555 7.576 L 25.555 4.319 C 25.555 3.443 25.175 3.007 24.378 3.007 C 24.014 2.99 23.661 3.133 23.411 3.399 C 23.161 3.664 23.039 4.025 23.078 4.388 L 23.078 7.576 L 22.003 7.576 Z M 28.344 0 L 29.418 0 L 29.418 7.575 L 28.344 7.575 Z M 30.914 4.849 C 30.822 3.873 31.29 2.929 32.123 2.412 C 32.957 1.895 34.011 1.895 34.844 2.412 C 35.677 2.929 36.146 3.873 36.053 4.849 C 36.151 5.828 35.683 6.777 34.848 7.297 C 34.013 7.817 32.955 7.817 32.119 7.297 C 31.284 6.777 30.817 5.828 30.914 4.849 Z M 34.947 4.849 C 34.947 3.668 34.416 2.977 33.485 2.977 C 32.55 2.977 32.025 3.668 32.025 4.849 C 32.025 6.04 32.55 6.724 33.485 6.724 C 34.417 6.724 34.947 6.035 34.947 4.849 Z M 37.185 6.035 C 37.185 5.055 37.916 4.488 39.213 4.408 L 40.689 4.324 L 40.689 3.853 C 40.689 3.278 40.308 2.953 39.573 2.953 C 38.972 2.953 38.557 3.173 38.437 3.558 L 37.396 3.558 C 37.505 2.622 38.386 2.021 39.623 2.021 C 40.988 2.021 41.759 2.702 41.759 3.853 L 41.759 7.576 L 40.724 7.576 L 40.724 6.81 L 40.639 6.81 C 40.288 7.37 39.662 7.697 39.002 7.666 C 38.54 7.714 38.078 7.564 37.732 7.253 C 37.386 6.943 37.187 6.5 37.186 6.035 Z M 40.688 5.57 L 40.688 5.114 L 39.357 5.199 C 38.607 5.249 38.268 5.505 38.268 5.985 C 38.268 6.475 38.692 6.76 39.277 6.76 C 39.623 6.794 39.968 6.688 40.234 6.463 C 40.5 6.239 40.664 5.917 40.688 5.57 Z M 43.172 4.849 C 43.172 3.127 44.058 2.037 45.435 2.037 C 46.13 2.005 46.78 2.377 47.105 2.993 L 47.186 2.993 L 47.186 0 L 48.261 0 L 48.261 7.575 L 47.231 7.575 L 47.231 6.716 L 47.146 6.716 C 46.796 7.326 46.137 7.692 45.434 7.666 C 44.048 7.666 43.172 6.576 43.172 4.849 Z M 44.283 4.849 C 44.283 6.004 44.828 6.7 45.739 6.7 C 46.646 6.7 47.205 5.995 47.205 4.854 C 47.205 3.719 46.639 3.002 45.739 3.002 C 44.834 3.002 44.283 3.704 44.283 4.849 Z M 52.71 4.849 C 52.618 3.873 53.086 2.929 53.919 2.412 C 54.753 1.895 55.807 1.895 56.64 2.412 C 57.473 2.929 57.942 3.873 57.849 4.849 C 57.947 5.828 57.479 6.777 56.644 7.297 C 55.809 7.817 54.751 7.817 53.915 7.297 C 53.08 6.777 52.613 5.828 52.71 4.849 Z M 56.743 4.849 C 56.743 3.668 56.213 2.977 55.281 2.977 C 54.347 2.977 53.821 3.668 53.821 4.849 C 53.821 6.04 54.347 6.724 55.281 6.724 C 56.213 6.724 56.743 6.035 56.743 4.849 Z M 59.293 2.127 L 60.328 2.127 L 60.328 2.993 L 60.407 2.993 C 60.687 2.355 61.34 1.965 62.034 2.022 C 62.571 1.982 63.097 2.188 63.464 2.582 C 63.831 2.976 63.999 3.516 63.92 4.049 L 63.92 7.576 L 62.845 7.576 L 62.845 4.319 C 62.845 3.443 62.465 3.007 61.668 3.007 C 61.304 2.99 60.951 3.133 60.701 3.399 C 60.451 3.664 60.329 4.025 60.367 4.388 L 60.367 7.576 L 59.292 7.576 Z M 69.996 0.771 L 69.996 2.152 L 71.177 2.152 L 71.177 3.058 L 69.996 3.058 L 69.996 5.859 C 69.996 6.43 70.231 6.681 70.767 6.681 C 70.904 6.68 71.041 6.672 71.177 6.655 L 71.177 7.551 C 70.984 7.586 70.788 7.604 70.591 7.607 C 69.396 7.607 68.92 7.185 68.92 6.135 L 68.92 3.058 L 68.055 3.058 L 68.055 2.152 L 68.92 2.152 L 68.92 0.771 Z M 72.646 0 L 73.711 0 L 73.711 3.002 L 73.796 3.002 C 74.089 2.359 74.754 1.969 75.458 2.027 C 75.992 1.998 76.511 2.209 76.874 2.602 C 77.237 2.994 77.406 3.529 77.334 4.059 L 77.334 7.576 L 76.258 7.576 L 76.258 4.324 C 76.258 3.452 75.853 3.012 75.093 3.012 C 74.719 2.981 74.35 3.117 74.085 3.384 C 73.821 3.65 73.687 4.02 73.721 4.394 L 73.721 7.576 L 72.646 7.576 Z M 83.605 6.105 C 83.303 7.132 82.31 7.796 81.245 7.682 C 80.518 7.701 79.819 7.4 79.334 6.858 C 78.849 6.316 78.627 5.589 78.727 4.868 C 78.63 4.146 78.852 3.418 79.334 2.872 C 79.816 2.326 80.511 2.016 81.239 2.022 C 82.755 2.022 83.67 3.058 83.67 4.769 L 83.67 5.144 L 79.822 5.144 L 79.822 5.205 C 79.788 5.609 79.926 6.009 80.203 6.306 C 80.479 6.604 80.868 6.77 81.274 6.766 C 81.8 6.828 82.311 6.567 82.569 6.105 Z M 79.822 4.349 L 82.575 4.349 C 82.603 3.979 82.473 3.614 82.217 3.345 C 81.961 3.076 81.604 2.928 81.233 2.937 C 80.857 2.932 80.495 3.08 80.23 3.345 C 79.964 3.611 79.817 3.973 79.822 4.349 Z" fill="rgb(0, 0, 0)" height="7.694460806975998px" id="daOmaFlTv" transform="translate(31.463 1.206)" width="83.67004100547061px"/></g></svg>)
" width="136.0379919189453px"><path d="M 7.128 3.969 C 7.128 4.954 6.836 5.738 6.252 6.323 C 5.589 7.018 4.725 7.366 3.662 7.366 C 2.645 7.366 1.78 7.014 1.068 6.309 C 0.356 5.602 0 4.728 0 3.685 C 0 2.641 0.356 1.766 1.068 1.061 C 1.779 0.355 2.645 0.002 3.662 0.002 C 4.168 0.002 4.651 0.101 5.11 0.297 C 5.57 0.495 5.937 0.757 6.212 1.085 L 5.593 1.705 C 5.127 1.147 4.484 0.868 3.662 0.868 C 2.92 0.868 2.278 1.129 1.737 1.651 C 1.195 2.173 0.925 2.851 0.925 3.684 C 0.925 4.517 1.195 5.195 1.737 5.716 C 2.247 6.226 2.941 6.508 3.662 6.499 C 4.45 6.499 5.107 6.237 5.632 5.712 C 5.973 5.37 6.17 4.894 6.223 4.284 L 3.662 4.284 L 3.662 3.437 L 7.078 3.437 C 7.111 3.621 7.128 3.798 7.128 3.969 Z M 12.544 1.025 L 9.334 1.025 L 9.334 3.259 L 12.229 3.259 L 12.229 4.107 L 9.334 4.107 L 9.334 6.341 L 12.544 6.341 L 12.544 7.207 L 8.428 7.207 L 8.428 0.157 L 12.544 0.157 L 12.544 1.023 Z M 16.364 7.209 L 15.458 7.209 L 15.458 1.025 L 13.489 1.025 L 13.489 0.159 L 18.334 0.159 L 18.334 1.025 L 16.364 1.025 Z M 21.839 7.209 L 21.839 0.159 L 22.743 0.159 L 22.743 7.209 Z M 26.762 7.209 L 25.856 7.209 L 25.856 1.025 L 23.887 1.025 L 23.887 0.159 L 28.731 0.159 L 28.731 1.025 L 26.762 1.025 Z M 37.902 6.298 C 37.209 7.011 36.347 7.366 35.317 7.366 C 34.287 7.366 33.425 7.01 32.733 6.298 C 32.04 5.586 31.694 4.714 31.694 3.684 C 31.694 2.653 32.04 1.781 32.733 1.069 C 33.425 0.356 34.287 0 35.317 0 C 36.342 0 37.201 0.358 37.897 1.074 C 38.593 1.79 38.941 2.659 38.941 3.684 C 38.941 4.714 38.594 5.586 37.902 6.298 Z M 33.402 5.707 C 33.923 6.236 34.561 6.499 35.317 6.499 C 36.073 6.499 36.711 6.235 37.232 5.707 C 37.754 5.178 38.016 4.504 38.016 3.684 C 38.016 2.863 37.754 2.188 37.232 1.66 C 36.712 1.132 36.073 0.868 35.317 0.868 C 34.561 0.868 33.923 1.133 33.402 1.66 C 32.881 2.189 32.619 2.863 32.619 3.684 C 32.619 4.504 32.881 5.179 33.402 5.707 Z M 40.212 7.209 L 40.212 0.159 L 41.315 0.159 L 44.742 5.642 L 44.78 5.642 L 44.742 4.284 L 44.742 0.159 L 45.648 0.159 L 45.648 7.209 L 44.702 7.209 L 41.117 1.458 L 41.078 1.458 L 41.117 2.816 L 41.117 7.207 L 40.211 7.207 Z" fill="rgb(255, 255, 255)" height="7.366075007056336px" id="Nybytt924" stroke-dasharray="" stroke-linecap="butt" stroke-linejoin="miter" stroke-miterlimit="10" stroke-width="0.18" stroke="rgb(255, 255, 255)" transform="translate(37.012 0)" width="45.64757094726559px"/><path d="M 31.835 5.527 C 29.072 5.527 26.819 7.628 26.819 10.524 C 26.819 13.402 29.072 15.522 31.835 15.522 C 34.599 15.522 36.852 13.402 36.852 10.524 C 36.852 7.628 34.599 5.527 31.835 5.527 Z M 31.835 13.552 C 30.321 13.552 29.015 12.303 29.015 10.523 C 29.015 8.724 30.322 7.494 31.835 7.494 C 33.349 7.494 34.655 8.724 34.655 10.523 C 34.655 12.302 33.349 13.552 31.835 13.552 Z M 20.893 5.527 C 18.129 5.527 15.877 7.628 15.877 10.524 C 15.877 13.402 18.129 15.522 20.893 15.522 C 23.656 15.522 25.909 13.402 25.909 10.524 C 25.909 7.628 23.656 5.527 20.893 5.527 Z M 20.893 13.552 C 19.378 13.552 18.072 12.303 18.072 10.523 C 18.072 8.724 19.378 7.494 20.893 7.494 C 22.407 7.494 23.713 8.724 23.713 10.523 C 23.713 12.302 22.406 13.552 20.893 13.552 Z M 7.875 7.061 L 7.875 9.18 L 12.948 9.18 C 12.797 10.373 12.4 11.244 11.793 11.85 C 11.056 12.588 9.901 13.402 7.875 13.402 C 4.752 13.402 2.31 10.884 2.31 7.761 C 2.31 4.638 4.752 2.12 7.875 2.12 C 9.56 2.12 10.79 2.782 11.698 3.634 L 13.194 2.139 C 11.926 0.927 10.241 0 7.875 0 C 3.597 0 0 3.483 0 7.761 C 0 12.039 3.597 15.522 7.875 15.522 C 10.185 15.522 11.926 14.765 13.289 13.344 C 14.69 11.944 15.126 9.975 15.126 8.385 C 15.126 7.892 15.088 7.439 15.012 7.059 L 7.875 7.059 Z M 61.112 8.707 C 60.696 7.59 59.427 5.526 56.834 5.526 C 54.259 5.526 52.121 7.552 52.121 10.523 C 52.121 13.324 54.24 15.521 57.08 15.521 C 59.37 15.521 60.696 14.12 61.245 13.306 L 59.541 12.169 C 58.973 13.003 58.197 13.551 57.08 13.551 C 55.964 13.551 55.169 13.04 54.657 12.037 L 61.34 9.273 L 61.113 8.706 Z M 54.297 10.373 C 54.24 8.442 55.793 7.458 56.909 7.458 C 57.779 7.458 58.517 7.892 58.764 8.518 Z M 48.865 15.219 L 51.061 15.219 L 51.061 0.529 L 48.865 0.529 Z M 45.267 6.643 L 45.192 6.643 C 44.699 6.057 43.753 5.526 42.561 5.526 C 40.062 5.526 37.772 7.722 37.772 10.542 C 37.772 13.343 40.062 15.521 42.561 15.521 C 43.753 15.521 44.699 14.991 45.192 14.384 L 45.267 14.384 L 45.267 15.103 C 45.267 17.015 44.245 18.037 42.597 18.037 C 41.253 18.037 40.42 17.072 40.079 16.258 L 38.168 17.054 C 38.716 18.379 40.174 20.007 42.597 20.007 C 45.172 20.007 47.349 18.492 47.349 14.801 L 47.349 5.829 L 45.267 5.829 Z M 42.75 13.552 C 41.235 13.552 39.968 12.285 39.968 10.542 C 39.968 8.782 41.235 7.494 42.75 7.494 C 44.246 7.494 45.42 8.782 45.42 10.542 C 45.42 12.283 44.246 13.552 42.75 13.552 Z M 71.398 0.53 L 66.144 0.53 L 66.144 15.219 L 68.337 15.219 L 68.337 9.654 L 71.398 9.654 C 73.828 9.654 76.216 7.895 76.216 5.091 C 76.216 2.288 73.828 0.53 71.398 0.53 Z M 71.454 7.609 L 68.336 7.609 L 68.336 2.574 L 71.454 2.574 C 73.093 2.574 74.024 3.932 74.024 5.092 C 74.024 6.231 73.093 7.61 71.454 7.61 Z M 85.004 5.5 C 83.417 5.5 81.773 6.199 81.093 7.749 L 83.04 8.562 C 83.456 7.749 84.23 7.485 85.043 7.485 C 86.177 7.485 87.33 8.165 87.348 9.374 L 87.348 9.526 C 86.951 9.299 86.102 8.958 85.062 8.958 C 82.964 8.958 80.828 10.111 80.828 12.266 C 80.828 14.232 82.547 15.497 84.475 15.497 C 85.949 15.497 86.762 14.836 87.272 14.061 L 87.347 14.061 L 87.347 15.195 L 89.463 15.195 L 89.463 9.563 C 89.463 6.955 87.516 5.5 85.003 5.5 Z M 84.74 13.55 C 84.022 13.55 83.02 13.192 83.02 12.303 C 83.02 11.17 84.266 10.735 85.344 10.735 C 86.307 10.735 86.761 10.943 87.347 11.226 C 87.181 12.543 86.067 13.535 84.74 13.55 Z M 97.174 5.821 L 94.66 12.189 L 94.585 12.189 L 91.978 5.821 L 89.616 5.821 L 93.528 14.722 L 91.298 19.673 L 93.584 19.673 L 99.613 5.821 L 97.175 5.821 Z M 77.425 15.219 L 79.618 15.219 L 79.618 0.53 L 77.425 0.53 Z" fill="rgb(255, 255, 255)" height="20.006724818420224px" id="hvSkd406o" transform="translate(36.425 11.75)" width="99.61298886718748px"/><path d="M 12.51 0 L 0 13.278 L 0.002 13.286 C 0.275 14.306 1.009 15.139 1.986 15.539 C 2.962 15.939 4.07 15.859 4.98 15.323 L 5.02 15.3 L 19.101 7.175 Z" fill="rgb(234, 67, 53)" height="15.790964445661945px" id="YFe_9rLyK" transform="translate(0 14.688)" width="19.100799999999992px"/><path d="M 12.94 3.533 L 12.929 3.525 L 6.849 0 L 0 6.095 L 6.873 12.966 L 12.919 9.478 C 14.012 8.89 14.696 7.752 14.7 6.511 C 14.704 5.27 14.028 4.126 12.939 3.532 Z" fill="rgb(251, 188, 4)" height="12.966125000000186px" id="tWnpLC90g" transform="translate(12.338 8.813)" width="14.70016543762592px"/><path d="M 0.115 0 C 0.038 0.283 0 0.576 0 0.869 L 0 24.332 C 0 24.633 0.039 24.924 0.115 25.2 L 13.055 12.262 Z" fill="rgb(66, 133, 244)" height="25.20022500000023px" id="lHfzAJWmn" transform="translate(0 2.938)" width="13.055426442359114px"/><path d="M 12.602 15.112 L 19.076 8.639 L 5.011 0.485 C 4.101 -0.064 2.986 -0.152 2 0.246 C 1.015 0.644 0.274 1.482 0 2.509 L 0 2.513 L 12.603 15.113 Z" fill="rgb(52, 168, 83)" height="15.113308101755065px" id="JRn0OF1AZ" transform="translate(0 0)" width="19.076125000000047px"/></g></svg>)


Navigation
menu